There are few modules for Drupal that provide you with very basic functionality that every website owner needs. This is why, we will install those before we actually start creating the content for our sample website.
Add a WYSIWYG editor to Drupal
By default, Drupal doesn’t come with a what you see is what you get (WYSIWYG) editor. However, even if you’re familiar and comfortable working with plain HTML, when it comes to content creation having a good editor can really speed up your workflow and make things easier in general. Our recommendation is to add TinyMCE since it’s one of the most popular and widely used editors out there, but if you want to use a different one – you’re free to do so, the instructions are the same.
STEP 1 Install the WYSIWYG API for Drupal
Instead of adding an editor module, first, you need to add a module that allows you to use every editor you want and is ported for Drupal 7. To install this module, follow the instructions in our tutorial on how to install Drupal modules. You can download the module from its official Drupal page.
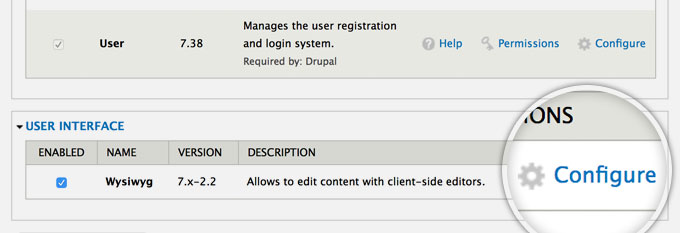
Once you install and enable to WYSIWYG module, go to modules and hit the Configure button next to it.

STEP 2 Add your preferred WYSIWYG editor
On this page, you will see the different supported editors and a direct download link. Unfortunately, you have to install those manually.

Follow the download link and download TinyMCE. Make sure you download version 3 because the fourth one is not supported by the module. Then, upload it to your account (via FTP for example) under the sites/all/libraries folder as instructed in the module description. Once you do that, refresh the module page, it should look like the screenshot below. Choose TinyMCE for all the different types of content input and hit the Save button at the bottom of the page.

STEP 3 Configure the WYSIWYG editor elements
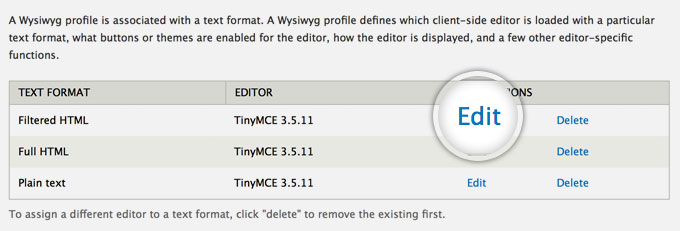
Next, you have to click on the Edit button next to the three different types of input and configure which buttons TinyMCE should show for it.

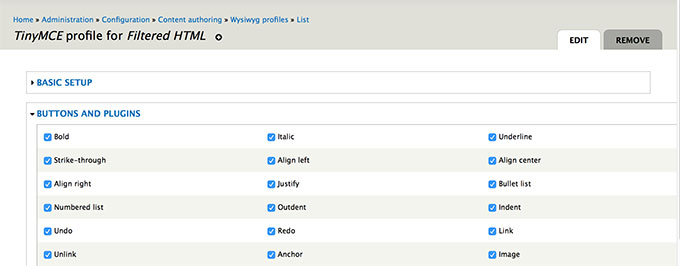
On that page, click on the BUTTONS AND PLUGINS tab and select all the functionality you need for your editor.

Finally, hit the Save button at the end of the page. Now, when you start creating your content, the page should look like this:

Enable the Image upload module in Drupal
In order to be able to easily upload and insert images to your content, you will need to install another module – Images. Thankfully, this module comes pre-installed with Drupal. All you need to do is make sure it’s enabled from the Modules page.

Now, when you edit your content, you will see a Image section under your articles that you can use to upload images from your computer directly to your articles.


 Phone: 1(877) 215.8104
 Login
Login