In order to add a new smilies (a.k.a. emoticons) you should first login to your administrative area. Usually the administrative area can be found in a subdirectory named ‘admin’,so if your message board is being hosted on http://example.com/phpbb, the administrative interface should be on http://example.com/phpbb/admin/.
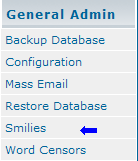
Once logged to your administrative area, click on Smilies from the General Admin menu. The menu is located on the left side of your screen.

Once you are inside that area you have a few options depending on what you are trying to achieve:
- add just one smilie;
- import a whole smilie pack;
- create a smilie pack.
Let us take a closer look at the first option.
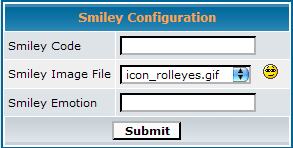
Click on the button Add a new Smilie and wait for the page to load. You should see something like this one:

In the smilie code field you should type the sequence of characters that will be used for the smilie to show up,for example the “smile” emoticon is “:)” (without the quotes), so place what you desire to use for accessing that smilie inside that field.
The second field is the so-called drop-drown menu, you should select the image for the smolie from this menu.
Please note that you should have the image uploaded already inside the images/smilies subfolder of your phpBB.
The last field is for typing the description of the smilie. For example, for the normal smile emoticon this field is “Smile”.
You are now on one click away from adding this new smilie to your message board, the only step that has left is to click the “Submit” button and you are ready.
Congratilations, you have just added your smilie to the message board.
If you want to add an avatar to your forum, you should connect to the FTP and upload the new avatar(s) to the images/avatars folder.
Please bear in mind that the permissions of the new file should be at lest 555 (if you are being hosted on linux) or read+execute (if you are being hosted on windows – the so-called asp.net hosting service)

 Phone: 1(877) 215.8104
 Login
Login